Create your first bundle | Symfony 2 | Beginners Guide

Hi All,

Welcome back. Today I am going to focus your attention on bundles. Well, the bundle is the most famous term you will frequently hear, during your adventure in Symfony 2. Actually, the bundle is a really handy feature which has been introduced by any PHP framework (not quite sure about rest of the frameworks) so far. Well, a Bundle is a package, collection of views, entities, controllers and so on. You can organize your code around bundles in a very smart way. And if you use bundles smartly, you can develop a system with highly independent features. Why not we discuss some examples before creating bundles,

  • Example 1 : Assume you are creating a basic employee management system. The basic features in a employee management system are employee registration, employee profile, employee payroll, employee attendance and so on. For employee registration, we have a separate UI with relevant registration form fields, we have separate functions (let’s call them controllers), such as checking existence of the employee, validity of the user input values, validity of employee national insurance number (in UK), and so on. And also, we got separate tables to insert values once the user submitted his/her employee registration form. Likewise we can group things (mainly model, view and controllers) in a functional way (but, it’s totally up to you). We call  these grouped things as ‘bundles‘ in Symfony 2.
  • Example 2: Let’s say you are creating a shopping cart system. In a shopping cart system, we know there are products, categories, sub categories, payment methods and so on. In here, we can have a separate bundles for products, categories and so on. For an example, inside categories bundle, we can nicely arrange things which are mostly relevant to managing categories. These things can be views (html and associated js, css files and so on), models (tables, schema and so on) and controllers (functions such as adding a category, deleting category and so on). So, in here, we are arranging bundles in a logical way. Likewise, you can organize your bundles for products, sub categories and so on. Continue reading
Share

How to setup Symfony 2 in XAMPP | Beginners guide

Hi all,

Today, I will be showing you how to setup Symfony 2 in XAMPP environment. This is a real beginners guide, so this post is for beginners, and will be useful to fellas who are new to PHP frameworks, setting up frameworks in XAMPP.

  1. First thing you need to do is download the latest version of Symfony 2 from the Symfony 2 website. (The most latest version for this moment is 2.7) And also you need to download the most recent version of XAMPP from their website. (The most recent version is 2.4.17). Then install the XAMPP using default settings.
  2. I hope you have a working version of XAMPP and downloaded Symfony 2 zip file. Create a folder called ‘Symfony‘ inside this path ‘C:\xampp\htdocs‘.  (If you haven’t installed under C:\ or installed in different directory, make sure you use that path). Now what you have to do is, extract Symfony 2 zip file in ‘C:\xampp\htdocs\symfony‘ location. Continue reading
Share

Many-to-one relationship mapping using Doctrine 2 in Symfony 2 in YAML

Hello doctrine lovers,

Well come back. In my previous post, we discussed how to map one-to-one relationships. If you have not read it but want to make yourself aware of one-to-one relationship mapping in Doctrine using YAML, make sure you read it before reading this post. So, today I am going to show you how to map many-to-one relationships in both unidirectional and bidirectional ways using Doctrine 2. As you are aware by now I will be using YAML instead of PHP annotations or XML. It is simply because YAML is very easy to understand (though you need to stick with proper indentation, which is not a big deal), will not run into unexpected problems, such as pre-compilers/caching engines tend to ignore comments, which will be used in annotations and few other things. By the way, in Symfony 2, you can use either YAML, Annotations or XML as part of the Doctrine configuration, but use one, not all. Symfony 2 evaluates all these methods equally. At the end of this post, you will learn a technique to evaluate your mapping whether it’s correct or not. So make sure you don’t miss anything in this post.

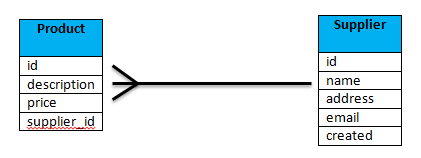
So back to the topic. Let’s have a quick look at what’s many-to-one relationship is all about. In simple terms, many-to-one is many rows of a table can be relate with only one row of another table. Take a look at the image below,

many-to-one-relationship

So basically, what this tells is, one supplier can have more than one product. For an in instance supplier ‘acer’ can have more than one products such as aspire e1 series laptops, e2 series laptops and so on.

Unidirectional – Many to One

In Unidirectional many-to-one mapping, you will only point to the target table from the parent table (same as in the one-to-one example in my previous post). I call ‘product‘ table as the owning side (parent table) and ‘supplier‘ table as the target table. The reason why I declare parent table to be the owning side is below, Continue reading

Share

One-to-one relationship mapping using Doctrine 2 in Symfony 2 in YAML

Hi doctrine 2 lovers,

As I promised in my previous post, here I came with my very next post, which is the relationship mapping using Doctrine 2. Before going any further make sure that you have read my previous post, which is about table mapping using Doctrine 2.  And I assume you have at least a little bit of knowledge about using Doctrine 2 YAML syntaxes and indentation, which is also highlighted in my previous post.  Ok, enough about my previous post, now let’s get back to the today’s topic 🙂

As you know, or will know in a moment, there are two major types of relationships between tables. Which are,

  1. Unidirectional
  2. Bidirectional

And with above two types, the relationship could be,

  1. One-To-One
  2. One-To-Many
  3. Many-To-One
  4. Many-To-Many

In this post I will be discussing on all eight combinations starting on Unidirectional/Bidirectional relationship types of one-to-one.

Continue reading

Share

Useful viva tips for BIT students | BIT Project tips

Hey all,

This post was originally posted in my facebook page (link), but I thought it would be useful for all the students who do Bachelor in Information Technology program. So here I’ve shared the post in my blog for your convenience.

Before your demo date (before less than 4-5 days)

  • Be confident about your project.
  • Forget about the areas/functions that you didn’t complete, instead concentrate and capitalize more on the areas/functions which you have already developed.
  • Add reasonable amount of data to all/applicable tables (20/30 rows or more in each table)
  • Nest your code neatly and apply comments where applicable in each page.
  • Thoroughly TEST your system before you go. Try different different combinations until you are satisfied with the expected outcome. It is really good if you show your project to your friend(s) and ask him/her/them to evaluate it, ask questions, enter data, etc.
  • Think and prepare for an effective route to demonstrate your project (described below)
  • Figure out and think of possible ways, how code modification phrase will impact you.  

Continue reading

Share